Have you checked out all my blogs?


Dollhouse Minis: http://joannesminis.blogspot.com/


18” Dolls: http://joannes18dolls.blogspot.com/


General Crafts: http://joannes-place.blogspot.com/


Monday, December 18, 2023

Creamy Veggie Casserole


This is a recipe that came about because I just didn’t feel like going out in the bad weather to go to the grocery store. So I had dug through my freezer and pantry to come up with a menu for dinner.


I had some frozen veggies on hand and I really didn’t feel like having them plain. So I did a quick google search for inspiration. I found about 4 or 5 recipes online that looked promising but I didn’t have all the ingredients for any of them. So I took the basic ideas and the things about them that I was most attracted to and came up with this recipe.


I’ve since made it a half dozen times or so and I have tried a couple of different frozen veggies combinations. I find the ones that have broccoli and cauliflower taste the best to me. But feel free to use the veggies that you love the most.


The ingredients in this recipe are things that are in my fridge/freezer/pantry most of the time so that’s why I’ve made it several times already. It is just easy and convenient besides it tastes delicious.


We start by, making the crumb mixture that will top our casserole. For that we are going to mix some breadcrumbs (I usually use Panko breadcrumbs for the extra crunch), Parmesan cheese (the kind in the can),some melted butter, and just a pinch of Italian herb seasoning.


Then we start the sauce. For that saute some onion in a bit more butter in a small pan over medium heat. 


Then add some flour and cook that a moment along with some seasonings. I like to add the seasonings at this point because they bloom into the sauce better than adding them later. Also by adding the flour to the onions you pretty much eliminate the possibility of getting any lumps of flour in your finished sauce.


Then add some milk to make a white sauce. Now just cook over medium heat until it thickens. 


At this point add the cream cheese and some shredded Parmesan cheese 


and stir until the cream cheese is melted.


Then stir in the frozen veggies.


Spread in a small casserole dish, 


top with the crumb mixture and bake.


I do highly recommend placing the casserole dish on a rimmed baking sheet just in case any sauce bubbles out, it will save you having to clean the bottom of the oven.


Since this bakes at 350°F it is the perfect partner to a lot of meat dishes. And since everything is already cooked you are just heating through and getting the flavors to mingle you could cook at a bit lower (for a few minutes more) or a bit higher (for a bit less time, just watch the topping that it doesn’t burn)


If you are out of shredded Parmesan for the cheese sauce you can use pretty much any shredded cheese you have on hand.


You can find a downloadable/printable version of this recipe here.


Creamy Veggie Casserole


topping ingredients:

2 Tablespoons dry bread crumbs (I prefer Panko breadcrumbs)

2 Tablespoons grated Parmesan cheese (the kind in the can)

1 Tablespoon melted butter

pinch of Italian herb seasoning


casserole ingredients:

¼ cup chopped onion

1 Tablespoon butter

1 Tablespoon flour

pinch Italian herb seasoning

pinch garlic salt

freshly ground pepper to taste

½ cup milk

1 ounce cream cheese

3 Tablespoons shredded Parmesan cheese


2 cups of frozen veggies, I used “winter mix” with broccoli and cauliflower


Pre-heat oven to 350°F.


Combine topping ingredients and set aside.


Saute chopped onion in butter over medium heat until softened.

Add the flour along with the seasonings and cook, stirring constantly for about 30 seconds.


Add the milk and stir to combine. Continue to stir until the mixture thickens.


Add the cream cheese along with the shredded cheese and stir until the cream cheese melts.


Carefully stir in the frozen veggies until coated.


Put in a small, 2 cup casserole dish.


Sprinkle on the topping mixture.


Bake at 350°F for 40 minutes until heated through and browned on top.


Yield 2 servings.

Saturday, December 16, 2023

Cook the Cookbook Project- week 7


This week I was both excited and apprehensive about the menu in the book. The main course is beef stew. I do love a good beef stew and I can’t remember the last time I made a batch for myself. So that was exciting. On the other hand the side dish/salad this week is made from lime Jello, the one and only flavor of Jello that I really dislike. I had promised myself that personal preferences were not going to dictate my doing this project and in reality there are very few foods I really don’t like. So I went ahead and made the lime Jello salad and it wasn’t as bad as I feared it would be.


So let’s talk about the menu then I have a few things to say about each item on the menu. The main dish this week was a pot of beef stew with dumplings. The side a lime jello and pineapple salad. And for dessert tapioca pudding with ginger cookies.


So the beef stew, I was really excited about this because it has been a long while since I have made myself beef stew. And topped with dumplings made it even more fun. I did cut back on the salt this week by a bit and it was a bit saltier than I would have normally made but much better than some of the dishes in this project have been. The thing that surprised me about the stew recipe was the lack of any kind of thickening agent to make the broth more like a gravy. This stayed as just a broth instead of the rich slightly thickened gravy like consistency I normally make. It was very good it just lacked that thicker texture that I was looking for. Also the recipe called for a pinch of ground allspice, which I am pretty sure I have never added and I want to experiment with a bit more in the future. I think it gave a really nice flavor to the stew and I will definitely be playing with allspice in other beef recipes in the future.


The dumplings directed me to use some Bisquick mix and they of course turned out wonderfully. There was a period of several years when my kids were young that I made dumplings a lot. They all loved them and they are so easy and make for a much more filling meal with little work.


Next was the Jello salad. If you are of a certain age you probably remember when green (lime) Jello was used all the time. And mixing in crushed pineapple was something that was done at a lot of “fancier” meals like for holidays or company. That being said my mom usually used lemon Jello instead of the lime most of the time. I was very worried about this part of the menu since lime Jello is about the only flavor I don’t like. But at the beginning of this project I said I was not going to let any of my personal preferences dictate changes to the menu. So I made the salad as the recipe was written. The only change I made was to make just one serving instead of the 2 the recipe dictated. It was actually better than I remembered it and it did make a nice accompaniment to the stew. It was definitely like stepping back in time a bit.


For dessert the book’s menu called for Tapioca Cream (pudding) which they directed the reader to make from a box of tapioca pudding mix. They did top it with some fruit juice which I skipped because I forgot to put it on my grocery list. Again a dish I haven’t made in many years. When she was growing up my daughter loved tapioca pudding.

Along with the pudding the menu called for ginger cookies to be made from a box of Betty Crocker Gingerbread Mix. My grocery store didn’t have any type o gingerbread mix on the shelves and since I have a batch of Christmas cookies that I just made a couple of days ago I decided to just have a couple of those in place of the gingerbread ones.


So overall this was a really fun menu with a wonderful main dish that I am very glad I made. The dumplings were a fun addition and reminded me how much I enjoy making them. I need to make them a lot more often this winter.


So up next week in the book is a menu based on baked beans and I am looking forward to seeing how they turn out.

Monday, December 11, 2023

Blackberry Pie for 2 (w/ Frozen Berries)


I have been looking for small pie pans that are about 6” in diameter for a while now. I finally found some although they are disposable foil ones to use for now. I found these on Temu, so they are very inexpensive also. Since I got them I have been on a trek of making pie, all the pies. So I decided I would share at least this one here with all of you. I love blackberry pie no matter what the time of year. By using frozen berries I can have it all winter long.


But before we get to the recipe I thought I would talk about why I have been searching for this size pie plate. For small batch baking the 6” pie is perfect for one or two people. You get 4 slices of pie from the finished pie so you feel like the work making the pie was worth the effort. But at the same time you don’t feel like you have the pie that never gets finished. I have some smaller, 4” pie pans and I find that to be an awkward size for most pies. For me its just a bit too big for one serving but not really satisfying when cut in half. I have several 8” and 9” pie pans from back when I was cooking for a large family and on the rare occasions I make a pie in either of those sizes as much as l love pie its just too much to get eaten in a timely manner. So the 6” pie pan hunt began.


The set of these I got from Temu had 20 foil pans for around $5.50, so a good price and I have found I can wash them out at least a couple of times and re-use them so they don’t get sent to the landfill quite so fast as they otherwise would. Since they are designed to be disposable they are very thin and floppy. I find if I double them up and use two at a time they work much better. They don’t bend too much while I am filling them and the pie bakes much more evenly. Since I am using them multiple times this isn’t as wasteful as it would be if I was tossing them after a single use.


To begin with you will need some pie crust, I’m not including that recipe today but if there is interest I would be happy to pop my recipe up in the future. Just let me know. To make a 6” two-crust pie you will need the amount of dough that would normally make a 9” single crust pie. So half a normal 9” pie crust recipe or a single sheet out of a box of refrigerated pie crust. You will most likely have some left over but that is much better than running short and having to make your crust too thin.


For the filling I adapted the berry pie recipe my mom taught me many years ago. I love this one because it goes to together really fast. Growing up on the farm we always had tons of blackberries fresh in season and then in the freezer all the rest of the year since we had several big berry bushes around.


The filling recipe only takes 4 main ingredients: sugar, flour, cinnamon, and the frozen berries. Then a bit of butter just before the top crust goes on. It is important to start while the berries are frozen to avoid them turning into a mush as you try to mix the filling. Also be sure to check the ingredients list if you purchased the berries. If they have sugar added cut the sugar called for in the recipe in half.


To create the filling gently combine the filling ingredients in a bowl coating the berries. Then allow the berries to thaw at room temperature giving the mixture a couple of gentle stirs as the berries thaw. Be careful to not break up the berries as you stir.


Once the berries are thawed most of the way line the bottom of the 6” pie pan with a layer of crust, add the filling then add a bit of butter cut into small pieces then cover with the top crust.


Bake the pie, it is best served slightly warm.


You can find a downloadable/printable version of this recipe here.


Blackberry Pie for 2

(w/ Frozen Berries)


pie crust of your choice, either enough for a single 9” pie or a recipe for a 6” 2-crust pie


1/3 cup granulated sugar

2 Tablespoons flour

small pinch of cinnamon

1 ½ cups frozen blackberries (un-sweetened see note below)**


½ Tablespoon butter cut in small pieces


Combine the sugar, flour and cinnamon in a bowl. Add the frozen blackberries and gently stir to combine. Allow the berries to thaw at room temperature. Gently stir the mixture a couple of times while the berries are thawing. 


Be very gentle so you don’t break up the berries.


Once the berries are thawed pre-heat the oven to 425°F.


Roll half the crust out and use it to line a 6” pie pan.


Add the berry mixture.


Dot with the butter.


Add the top crust crimping around the edge.


Trim even with edge of pan.


Cut a couple of slits in the top crust to allow steam to escape while baking.


Place pie pan on a foil covered sheet pan (in case of drips)


Bake in 425°F oven 35 to 45 minutes. You will know it is baked when the crust has developed a nice light brown color and the juices are bubbling through the slits in the top crust.


Allow pie to cool before cutting.


Yield: I- 6” pie, 4 slices.


** note if your blackberries are sweetened only use half the amount of sugar called for in the filling.

Saturday, December 9, 2023

Cook the Cookbook Project- week 6


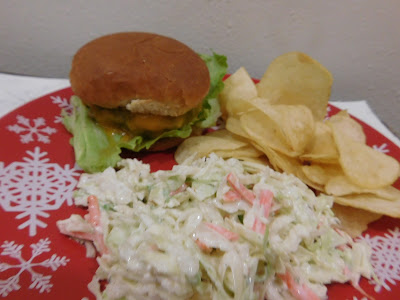
This week I actually ended up skipping a menu (we will get back to it, I need to locate one of the called for items) and moving on to this burger menu.


According to the list at the beginning of the chapter burgers had the 10th spot on the list of favorite foods. I wonder where they would fall on a similar list today. I think they would rank in the top 5 what do you all think?


The menu I worked with this week was: Broiled hamburgers, Cabbage Salad (coleslaw), and hot potato chips. This was to be followed with Canned Apricots and store bought cookies for dessert.


This is a very simple menu with virtually nothing needing to be prepared ahead of time. The little paragraph explaining the menu did say to be sure to chill the can of fruit ahead so I just put it in the fridge when I took it out of the grocery bag after shopping.


I did have to make a couple of changes to the instructions this week and I will talk about those as I discuss the places they occurred.


So the star of the menu was a Broiled Hamburger. First this was the strangest recipe for a burger I have ever made. I would love to hear if any of you have ever run into the following. The burger ingredients called for a ½ pound of ground beef for the 2 burgers, pretty normal and just what I expected. This was to be seasoned with salt and pepper with a little bit of chopped onion, again exactly what I would expect. Here is what was/is strange to me it also called for ½ cup of either water or milk to be mixed into the meat. I’ve checked several of my other vintage cookbooks and I didn’t see this addition in any of them. I found it strange and I am not sure if I liked what it did to the texture of the meat patty or not. It seemed heavier in a way and way too moist. I guess if you know you are going to be over cooking these it might be a good idea, I’m pretty sure you could cook these to death and they would still not dry out. I am glad I tried this but I doubt I will do it again. It wasn’t bad just not a change I think is necessary.


I did change a couple of things about the burgers however, first the recipe didn’t really give any toppings and I almost always add cheese to my burgers so I did add a slice of sharp cheddar and a couple of lettuce leaves to mine. The other change I had to make was the cooking method. The book called for broiling the burgers and I tried to do this but my oven broiled just was not hot enough to get the job done. So after several minutes of not getting my burgers to even look like they were thinking about getting cooked I switched them over to my cast iron skillet and they were done in a normal amount of time. Pretty if I had stuck with the broiler I would still be waiting for them to cook.


The first side dish listed is cabbage salad, or as we normally call it coleslaw. I ended up getting a bag of coleslaw blend since the cabbage display was pretty much empty and the ones there looked like they should have been tossed a few days before. I also opted to use just purchased mayo instead of making the dressing in the book which was basically just a version of mayo anyway. I had forgotten to pick up a couple of the ingredients I would have needed to make it.


The other side dish was hot potato chips. I have a couple of vintage cookbooks that talk about heating potato chips in the oven to make them taste fresher. I had never tried it so I gave it a try. They did taste really nice immediately out of the oven but by the time I took a couple of pictures and got sat down to eat they were back to room temperature and tasted just like they did straight out of the bag.


For dessert with this menu the suggestion was some canned apricots with store bought cookies. I do love canned apricots although I seldom buy them so that was almost a treat. Since I still have some of the chocolate chocolate chips cookies I made last weekend I had a couple of those rather than buying a package of cookies for just me.


So what are my thoughts this week on the menu. It was very comforting menu I do love a good burger so that was good. Again the biggest thing I am missing in these menus is some kind of seasoning other than just salt and pepper. This week at least the salt levels were more in control than last week and the portions didn’t seem so large.


I am still enjoying this journey through the cookbook and I hope you are enjoying going on the adventure with me.


I am excited for next week because the menu is centered around beef stew.

Monday, December 4, 2023

Chocolate Chocolate Chip Cookies

Chocolate Chocolate Chip Cookies


I used to make a very similar cookie when my kids were growing up and I have bee trying to replicate them in a small batch recipe off and on for a couple of years. For whatever reason I had a lot of trouble getting this one to scale down to a dozen or less cookies and keep the both the texture and the taste I was after. I have finally arrived at what I believe is the closest to those I used to make (about 5 dozen per batch back then) in a small batch.


Because I use a dark cocoa my cookies are a very dark chocolate. You can use whatever cocoa you wish keeping in mind that the richness of the cookie will be determined by the cocoa. I typically use Hershey’s Special Dark Cocoa because I love a dark slightly bitter chocolate. If you do also and haven’t tried this variety of cocoa I do recommend you give it a try. I can find it in almost every grocery store I have looked. One big advantage (besides the taste) is that it is usually the same price as the regular Hershey’s Cocoa but with so much more flavor.


Like a lot of cookie recipes we start by creaming the butter and sugar together. Make sure your butter is at room temperature before you start this process. In this recipe I am using equal amounts of white granulated sugar and dark brown sugar. This gives a chewy rich cookie with a with a slightly crisp exterior. You could use a light brown sugar but the baked cookie will not be as rich or as chewy as intended.


Once you have a well creamed mixture add the vanilla, salt and egg yolk. I typically use Kosher salt because I like the tiny slightly salty bits in the baked cookie. If you use a fine salt be very careful of adding too much. Beat the mixture to combine everything very well.


Now in a separate bowl whisk together the flour, baking soda and cocoa powder until well combined. When making larger batches of cookies this was step I often skipped but for the small batches like this one it is really important to have the dry ingredients combined before you add them to the butter mixture. If you skip this you run risk of over beating the cookie mixture, resulting in a tough cookie.


Gently combine the dry ingredients with the butter mixture just until well mixed.


Now gently stir in the chocolate chips and the chopped nuts. Again being careful to not over mix.


Once everything is combined move the dough the refrigerator for at least 30 minutes. This is a must for this recipe otherwise the cookies will spread way too much.


Once well chilled use a cookie scoop to form equal size balls of the cookie dough. Roll them into balls, flatten slightly and bake at 350° F for about 9 minutes. Watch these carefully and pull them out when the outer edge of the cookies begins to set. They should be slightly puffed but not set in the middle.


Allow the cookies to remain on the baking sheet for 10 minutes before moving them to a wire cooling rack.


You should get around 1 dozen cookies.


You can find a downloadable/printable version of this recipe here.


Chocolate Chocolate Chip Cookies


¼ cup butter, room temperature

¼ cup granulated sugar

¼ cup dark brown sugar

½ teaspoon vanilla

¼ teaspoon Kosher salt

1 egg yolk

¼ teaspoon baking soda

½ cup all purpose flour

2 Tablespoons unsweetened cocoa powder

½ cup chocolate chips

¼ cup chopped nuts


In a medium mixing bowl beat the butter and sugars together until well combined and fluffy. Add the vanilla, salt and egg yolk and mix to combine well.


In a separate small bowl combine the baking soda, flour, and cocoa powder until well mixed.


Add the flour mixture to the butter mixture and mix just until well combined.


Gently stir in the chocolate chips and chopped nuts.


Chi ill the dough for 30 minutes.


Preheat oven to 350°F


Once the dough is chilled use a cookie scoop to scoop out the dough then using your hands roll each portion into a ball.


Place on an un-greased cookie sheet and bake at 350°F for 8 to 10 minutes. Mine usually take right about 9 minutes. Watch them carefully, because of the chocolate dough it is really easy to burn these. You want to remove when they are just starting to set around the edges.


Cool on pan for 10 minutes.


Move to a cooling rack to completely cool.


Yield 10-12 cookies.