Have you checked out all my blogs?


Dollhouse Minis: http://joannesminis.blogspot.com/


18” Dolls: http://joannes18dolls.blogspot.com/


General Crafts: http://joannes-place.blogspot.com/


Monday, November 27, 2023

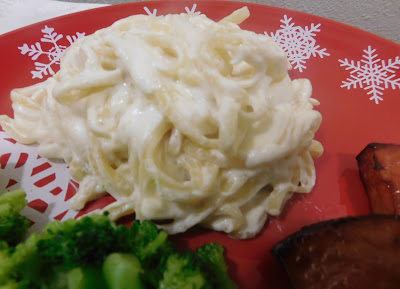
Super Simple Pasta Alfredo


Super Simple Pasta Alfredo


T
his is such a simple and quick pasta dish and on that I make variations of all the time. Only a few ingredients are needed and in the time it takes to cook the pasta the sauce is ready. The version I am giving here is for an Alfredo style sauce but it can be changed up to go with any meal.


This can also be either a side dish or even a main dish. Think of it as homemade version of the pasta mixes that are on the shelves at the grocery store except it tastes way better. It is also really good with some cooked meat and veggies added for a one dish dinner.


The basic sauce it simply butter, milk, cream cheese and shredded cheese. In this rendition of it I used Parmesan cheese to make it very much like a simple Alfredo, but can change out that cheese and the personality of the dish changes with it.


For example one of my favorites is to add a bit of chopped onion and chopped jalapeno (just cook them in the butter then add the milk) Then I use either a shredded Mexican blend cheese or just some shredded cheddar. Perfect side dish for a Southwest meal.


You could make the recipe with an Italian blend of cheeses (or sub in some Mozzarella for part of the cheese) and add some herbs and you have another side.


You could add some finely chopped broccoli and use cheddar cheese for another option.


The possibilities are almost endless depending on what is on hand.


Since I use all the ingredients that are in this dish a lot they are almost always in my fridge. i almost always have variety of cheeses on hand so I can create a side dish to go with just about any meal with this simple formula.


As for the pasta I used linguine this time, I had wanted to use some fettuccine but my grocery store was completely out the day I shopped. But you could use any pasta shape you have on hand. This is also really good with stuffed pastas like tortellini or ravioli so again use what is on hand.


So let’s talk about the steps to make this.


Start a pan of water to boil for the pasta and cook it according to the instructions on the package. Most of the dry pasta I buy the cook time is right around 10 minutes.


While the pasta is cooking, melt the butter with the milk in a bowl in the microwave. You just need to get it warm enough to melt the butter. If you are adding chopped onion or other add-ins that need to cook go ahead and just melt the butter and cook them in the melted butter about a minute, then add the milk and heat them together.


Now stir in the cubed cream cheese and microwave 30 seconds at a time stirring each time until the cream cheese is melted.


Now add the shredded cheese and again microwave in 30 second bursts, stirring each time until the cheese melts.


 Add the drained, cooked pasta to the sauce and stir to combine.


You can find a downloadable/printable version of this recipe here.


Super Simple Pasta Alfredo


4
oz dry pasta

¼ cup milk

¼ cup butter

3 oz cream cheese, cubed

1/3 cup shredded Parmesan cheese


Cook the pasta according to the package directions.


Pu the milk and butter in a medium size microwave safe bowl and heat until the butter melts.


Add the cubed cream cheese and microwave in 30 second bursts, stirring between each, until the cream cheese melts.


Add the shredded cheese and again microwave in 30 second bursts, stirring between each until cheese is mostly melted.


Add the drained, cooked pasta and stir to combine.


Makes 2 generous servings.
Saturday, November 25, 2023

Cook the Cookbook Project- week 4


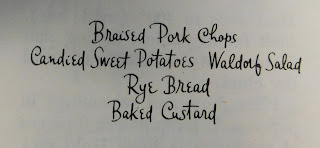
This week the menu was a braised pork chop, candied sweet potatoes, Waldorf salad, rye bread, and baked custard.


For the braised pork chop I had been keeping my eyes open at the grocery store for any chops on sale for a couple of weeks. I had come across a package of 2 thick cut chops (labeled as “princess cut”) and had stashed them in my freezer for this meal. They were very thick but wonderfully tender and they tasted really nice. I don’t often braise my pork chops but these were very nice. I did the recipe as written, which is the whole idea of this journey. So I only used the salt and pepper called for so that was a bit limiting. Normally I would have seasoned them a little differently. Also the recipe did not have me do anything with the liquid left in the pan which I think was a true loss. I could have made a wonderful pan sauce with just a few additions but that would have been straying from the project.


The candied sweet potatoes were very nice but very filling. The recipe called for 2 or 3 sweet potatoes so I only used 2 and picked the smallest ones available at the store. It was still way more that 2 servings I could have gotten away with just using 1 sweet potato and would have had enough to make two servings in my opinion. The recipe called for cooking the sweet potatoes then cutting them into slices and coating them with a syrup before baking. Normally when I cook sweet potatoes I stick to a more savory angle so this was a departure for me in that regard.


The Waldorf salad was the other side dish which to me really didn’t fit the menu all that well. I can think of dozens of other things that would have been better. The main problem for me was this was sweet on top of the sweet potatoes being extremely sweet and it was just too much sweet. I mean I do like a Waldorf salad from time to time but I usually wouldn’t serve it with another sweet side dish.


The rye bread was a nice counterpoint to all the heavy sweet parts of the meal. I always forget how much I enjoy rye bread. I did take the easy way out and bought a loaf of pumpernickel which is so nicely bitter and goes so well with so many other foods.


For dessert the menu had me make a baked custard. This is the exact same baked custard I have been making all my life. It is also the same recipe my mom made on a regular basis and I know from what my mom told me growing up it was a recipe my grandmother made a lot also. The book wanted me to un-mold the custard onto a plate, but mine would not budge from it’s dish so I just ate it in the dish like I always do. The book also said to top it with either thawed frozen raspberries or grape juice. I went with the raspberries since I already had some on hand. It was okay but I think I will stick with just a sprinkle of nutmeg in the future.


So my thoughts on the menu, most of which I’ve already stated today. It just had way too much sweet and not enough savory for me this time. Again the portions were much bigger than I would normally make but I am getting to the point where that is my expectation.


I will probably make braised pork chops more often since I have been reminded of them but believe me I will be making a delightful pan sauce to pour over them.


For next week I am looking forward to Spaghetti with a meat sauce.

Monday, November 20, 2023

Breakfast Quesadillas Two Ways


A quesadilla might just be the perfect hand held food. It is like a sandwich without being weighed down with too much bread. They are fun to eat, easy to make and can be eaten on the go.


I have two versions of Breakfast Quesadillas for you today and in my opinion they are kind of the extremes in each direction. I have a small very plain one and a larger loaded one. You can make either, both or more likely something that is in between and perfectly suited to whoever has the pleasure of eating it.


For the small plain one we will only need a 6” flour tortilla, an egg and some shredded cheese.


For the loaded version I step up to an 8” flour tortilla, 2 eggs., and the cheese along with the fillings that sound good on the day I am making it.

Today those items were: bacon, a couple of green onions, and salsa.


In addition we need some cooking spray (like Pam) to coat the tortilla. You will also need some butter to cook the eggs in if you don’t use something like bacon or sausage.


Of course these are just suggestions, you could add other veggies, peppers are wonderful as are sliced avocado. Use you imagination and look through the fridge to see what’s there.


No matter which size you are making it is important to use a skillet that is close to the size of your tortilla. This will make the process of cooking and assembly so much easier.


To make the small simple quesadilla pre-heat your skillet over medium heat, add some butter to melt.


Meanwhile beat the egg with salt and pepper to taste. Once the butter melts add the egg to the pan. Swirl the pan a bit to cover the bottom evenly.


Allow the egg to cook on the bottom then add some shredded cheese. You want the egg to still be runny on the top.


Add the tortilla over the cheese and press it lightly into the cheese/egg. Immediately spray the top of the tortilla with some cooking spray.


Flip the entire tortilla, egg, cheese stack over so the tortilla is on the bottom. This will be fairly easy once the egg cooks and releases from the pan.


Now add a bit more cheese.


Fold the quesadilla in half and cook, flipping occasionally until the outside of the tortilla is crispy.


Remove from the skillet to a cutting board and cut in half.


Enjoy!


For the loaded version heat your skillet and if you are using bacon or sausage add that to the pan to cook. Be sure to cut up the bacon first.


Once the meat is cooked through and crispy in the case of the bacon. Remove to a paper towel lined plate and add any cut up veggies to the grease left in the pan. Cook until tender.


Add the meat back into the pan and spread the fillings around the pan evenly.


Beat the eggs with seasonings of your choice and pour over the meat and/or veggies in the pan. Swirl to cover most of the bottom of the pan and cook until the bottom surface of the eggs are beginning to set. 


Add a layer of shredded cheese.


Immediately add the tortilla to the top and gently press it down onto the cheese and egg base in the pan.


Spray the top of the tortilla with pan spray.


When the eggs have cooked enough to loosen from the pan flip the quesadilla over so the tortilla is on the bottom.


Add a bit more cheese and salsa.


Fold in half.


Cook, flipping occasionally until the tortilla is crispy.


Remove to a cutting board and cut in half.


Serve and enjoy.


Either of these are great on their own or with salsa or sour cream to dip them into.


You can find a downloadable/printable version of this recipe here.


Breakfast Quesadillas


Small quesadilla:


Butter

1 egg

salt and pepper to taste

shredded cheese

6” tortilla

pan spray (like Pam)


Melt butter in a small skillet over medium heat.


Beat the egg with some salt and pepper to taste and add to the pan with the melted butter.


Swirl the pan to spread the egg over the bottom of the pan.


As soon as the egg starts to set on the bottom add a layer of shredded cheese.


Top with the tortilla, press the tortilla down into the cheese and egg. Spray the top of the tortilla with the cooking spray.


As soon as the egg is cooked enough to let go of the pan flip the quesadilla over and add a bit more cheese to the top.


Fold and cook until crispy on both sides.


Serves one.


Loaded Quesadilla


2 strips of bacon, cut up

2 green onions, sliced

2 eggs

salt and pepper to taste

shredded cheese

8” tortilla

pan spray (like Pam)

salsa


(these are just suggestions feel free to use what you have on hand to fill yours)


Start by heating a skillet over medium heat, add the bacon and cook until crispy. Remove to a paper towel lined plate.


Add the onion and any other veggies you wish to the pan and cook until tender.


Meanwhile beat the egg with salt and pepper to taste.


Add the cooked bacon back into the pan spread the mixture over the bottom of the pan. Add the eggs to the pan and swirl the pan to cover the bottom of the pan.


Cook just until the bottom side of the eggs start to set then add the shredded cheese.


Immediately add the tortilla on top of the cheese. Lightly press down onto the cheese/egg mixture. Then spray the top side of the tortilla with pan spray.


Once the eggs have cooked enough to loosen from the pan flip the quesadilla over so the tortilla is on the bottom.


Add a small layer of cheese and as much salsa as you wish.


Fold the quesadilla in half.


Cook, flipping occasionally until the tortilla is crispy.


Remove to a cutting board and cut in half.


Enjoy!

Saturday, November 18, 2023

Cook the Cookbook Project- week 3


This week the menu was for one of my all time favorite dinners, fried chicken. And it was specifically oven fried chicken which is how my mom always made hers and how I normally make mine. Along with the chicken were some traditional mashed potatoes and gravy. To round out the meal there were “French-style” green beans, some cranberry-orange relish and strawberry shortcake for dessert.


A couple of observations I have about the menus and I assume the way Americans ate 60+ years ago. First off the portions are huge! I used slightly less of both the chicken and the green beans (weight wise) and the amount of potatoes called for and I was stuffed half way through the plate. I ended up covering the plate and re-heating it for lunch the next day. Secondly there is a much heavier emphasis on starch and protein in these menus than I think i see in more modern cookbooks.


So let’s talk about the items in today’s menu one by one.


The oven fried chicken, I love oven fried chicken and it is my go to for how I make mine. I did follow the recipe in the book so this batch was a little less seasoned than how I normally do mine. The book only called for adding salt, pepper and paprika to the flour. I normally add more herbs and spices than that and I normally add a bit of cornstarch to my flour to make the coating even more crispy. This really did remind me of the chicken my mom made though and it was wonderful. The only thing I did differently from the recipe was to dredge the chicken in a dish rather than shaking them in a bag with the flour.


Of course there were mashed potatoes with pan gravy along side the chicken. That was exactly what my mom would have served most of the year with it also. As much as I love mashed potatoes and gravy I don’t make it for myself very often and it was such a wonderful treat.


The book called for cutting the green beans “French-style” as in 4 thin strips from each green bean. That was a very tedious job so I ended up cutting mine a bit differently. The beans at my store were not in great shape this week (we lost our wonderful produce manager to another store and the department is not the same) so my beans were a bit limp and very curvy. I ended up cutting them all in half crosswise and then just once lengthwise. I don’t think I have ever cut my beans in this style although I have gotten them this way both frozen and canned. I think I’ll stick with not doing this in the future.


The cranberry-orange relish was a raw dish and I was not sure how it would turn out. I used some frozen cranberries that I had on hand and I think that is what saved the dish. I have made raw cranberry relishes in the past and not cared for them. I think because the berries had been frozen and then thawed they were softer and juicier which made for a very nice side dish.


For dessert the menu called for making strawberry shortcake. For the biscuit portion it just had me make a half batch of the shortcakes on the back of the Bisquick box.


We are well past the season for strawberries and the ones I got were not very good. I really wished I had skipped them and went to the frozen aisle. Again the fact we lost our wonderful produce guy is partly to blame along with the season.


So there we have it another menu under my belt and a bunch more to go. I am loving this journey and having a great time both with the cooking and eating of the foods but also with the memories they bring up.


I peeked ahead and next week the menu is for pork chops so I am really excited about that one also.


Monday, November 13, 2023

Mushroom Shepherd’s Pie


So what exactly is a Shepherd’s Pie and how is it different from a Cottage Pie? I wasn’t sure of that answer so I did some research, here is what I found. Basically a Shepherd’s Pie has two main components a layer of minced meat topped with mashed potatoes and baked. Most of the time the meat has a gravy and some vegetables with it. Often times those vegetables seem to be carrots and/or peas. It is also very common to have some shredded cheese on top of the potatoes. As for the difference between a Cottage pie and a Shepherd’s Pie it comes down to the meat used in the filling. To really be a Shepherd’s Pie the filling should be lamb/mutton. So technically speaking this is a Cottage Pie but for most people the terms are interchangeable and no matter what the filling is based on if it is has the meat (or a substitute), gravy, veggies and is topped with mashed potatoes and baked it is a Shepherd’s Pie.


That was probably more than anyone needed to know about the subject but if you are still with me thank you. Now onto the recipe for today.


I love a good Shepherd’ s Pie especially with the cooler weather we are getting now. And although I have some recipes I love that take both beef and lamb I think I like this meat-less version better than any of the others. There is something about the combination that makes it a very pleasing dish. It is very filling but not to the point you feel stuffed. You still feel pretty good about yourself after eating it even if you overindulge a bit.


This version is vegetarian if you wish and could also be make to be vegan if desired with a just a few simple substitution. You could also go with an almost vegetarian version. I’ll talk about that in a moment.


As for dishes to bake in I love cooking mine is my two 1 ½ cup casserole dishes. That way each serving is in it’s own casserole dish making plating so much easier. Also if both aren’t going to be eaten right away it is easy to store and reheat later. This could also be baked off in a 3 cup casserole dish or you could leave it in the skillet you make the filling in and just pop the mashed potatoes on top and bake it that way providing your skillet is oven safe.


So lets talk about the ingredients and the steps involved in making this.


We need to start by cooking the potatoes for the mashed potatoes since they will take a while. You can use whatever type of potato you like to use for mashed potatoes. I have some large russets on hand since that is what I am using for the Cook the Cookbook project so I used a couple of those. That gave me slightly more potatoes than I needed but just one wouldn’t have been enough. Simply peel the potatoes and cut them up. The size you cut the potatoes and veggies will determine how long they cook.


Now onto the prepping the rest of the ingredients. Clean and cut the mushrooms in quarters and set aside.


Peel and dice the carrots and the onion and set aside.


While those potatoes are cooking we are going to create the filling. Start by cooking the cut up mushrooms in some olive oil in a large skillet. You want to get them browned in this first step.


Then we’ll add the carrots and onion and cook them until tender.


The sauce is created in the pan with all the veggies. Butter will add the needed fat to create the roux as well as add flavor. Once melted we will add the flour and seasonings to finish that roux.


To help round out the flavor we are now adding some tomato paste. We only need a small amount (1 ½ ounces) You could use the tomato paste from a tube or for a more economical solution do what I do. I buy the tomato paste in a can at the store and divide it up into 1 ½ ounce portions in small covered containers. I then bag the containers up and freeze them. It just take a short time for the tomato paste to thaw out and it is a lot cheaper than those tubes and still no waste. The tomato paste will be added to the roux in the pan to help develop the flavor.


Once the tomato paste is incorporated add the broth and stir to combine. For broth my favorite is a mushroom broth, but it can be a bit hard to find but is easy to make and freeze. You could also use a vegetable broth or even a beef broth if you are not concerned about being totally vegetarian.


Bring the pan to a boil then reduce the heat and simmer until the sauce thickens. At this point taste the sauce and season as desired. Depending on the salt level of the broth you are using may or may not need any more salt and/or pepper. If your potatoes are not cooked put the pan off heat with a lid on to keep it warm.


Once your potatoes are cooked drain them well. And make mashed potatoes by adding the 2 Tablespoons of butter to the hot potatoes and start mashing. Add half the shredded cheese (¼ cup) and start adding the milk a little at a time. Mash adding the milk as needed to get the texture you desire. Taste and adjust add salt and/or pepper as needed.


Spread the mashed potatoes over the filling in the casserole dishes almost to the edges of the dishes. Use a fork to flatten the potatoes some and sprinkle with the remaining cheese. I do highly recommend putting whatever casserole dish you bake these in on a sheet pan in case they bubble over a bit.


Then all that is left is to bake the casserole dishes of yumminess to get everything hot and to help the flavors to come together even more.


Since the casserole dishes are hot when they come out of the oven I usually fold a paper towel into 4 layers just a tiny bit larger than the size of the base of the casserole dish and put it on my plates before I add the hot dish. I’m not sure it’s absolutely necessary but I feel better about doing that than putting that hot casserole dish directly on my plate.


You can find a downloadable/printable version of this recipe here.


Mushroom Shepherd’s Pie


For the mashed potatoes

1 pound potatoes

¼ cup milk

2 Tablespoons butter

½ cup shredded cheddar cheese

salt and pepper to taste


For the filling

8 ounces whole mushrooms

olive oil

2 medium carrots

1 onion

1 Tablespoon butter

1 teaspoon garlic powder

1 teaspoon dried thyme leaves

1 Tablespoon flour

1 ½ ounces tomato paste

¾ cup stock (mushroom or vegetable are best, beef would also work)

Prep the potatoes by peeling and dicing them. Then put them into a small saucepan of salted water to cover. Bring to a boil turn reduce the heat to a simmer and cook until they can easily be mashed. This could take from 10 to 20 minutes depending on how large/small you dice them.


Now onto the prepping the rest of the ingredients. Clean and cut the mushrooms in quarters and set aside. Peel and dice the carrots and the onion and set aside.


In a large skillet heat some olive oil over medium heat and add the mushrooms and sprinkle with a bit of salt.


Cook them stirring occasionally until they are browned. This will take about 10 minutes.


Add the carrots and onion and a bit 

more olive oil if the pan is dry. Sprinkle just a bit more salt and cook. Stirring occasionally until the carrots are tender about 5 to 10 minutes (again the size you cut the pieces will determine the cook time)


Add 1 Tablespoon of the butter and allow to melt.


Now add the flour, thyme and garlic powder, stir to combine and cook for about 30 seconds to a minute.


Add the tomato paste and stir to combine.


Once the tomato paste is incorporated add the broth and stir to combine.


Bring the pan to a boil then reduce the heat and simmer until the sauce thickens about 5 minutes. At this point taste the sauce and season as desired. Depending on the salt level of the broth you are using may or may not need any more salt and/or pepper. If your potatoes are not cooked put the pan off heat with a lid on to keep it warm.


Once your potatoes are cooked drain them well.


Add the 2 Tablespoons of butter and start mashing. Add half the shredded cheese (¼ cup) and start adding the milk a little at a time. Mash adding the milk as needed to get the texture you desire. Taste and adjust add salt and/or pepper as needed.


Divide the filling evenly between two individual casserole dishes (about 1 ½ cups each)


Spread the mashed potatoes over the filling in the casserole dishes almost to the
edges of the dishes. Use a fork to flatten the potatoes some and sprinkle with the remaining cheese. I do highly recommend putting whatever casserole dish you bake these in on a sheet pan in case they bubble over a bit.


Bake at 350° F for about 20 minutes to heat through and melt the cheese.


Serve and enjoy.


Makes 2 generous servings.