Have you checked out all my blogs?


Dollhouse Minis: http://joannesminis.blogspot.com/


18” Dolls: http://joannes18dolls.blogspot.com/


General Crafts: http://joannes-place.blogspot.com/


Showing posts with label sandwich. Show all posts

Monday, January 22, 2024

Jalapeno Popper Grilled Cheese Sandwich


This is another sandwich that you really want to save for a day when you just need to treat yourself, or someone close to you. This one is really rich and over the top, but soooo yummy.


I had some jalapeno peppers on hand and I wanted to do something different with them. I decided to put them into a grilled cheese sandwich. I went online and found a handful of recipes to gather some inspiration from and the result is this sandwich. Since I was pretty much stuck at home because of the weather I used what was in my fridge and cabinets.


So let’s talk about the recipe and how to create it. I do want to point out that the ingredient list is for each sandwich, so just scale it up for however many sandwiches you are making. Or make one and split it (which would probably be the more sane idea…..)


The first step is to char the jalapenos. Coat them in a bit of olive oil and put them on an oven safe pan and then under a broiler set on high. Depending on your oven they will probably need about 5 minutes per side. You want a fairly good char all the way around. Once they are well charred remove from the oven and cover so they can steam and soften. This will take about 5 minutes.


Also to prepare for sandwich making you will need to cook the bacon. Once cooked drain on a paper towel to absorb some of the grease.


Meanwhile slice the green onion and combine it with the cream cheese and garlic powder. Then spread this mixture on both slices of bread.


On one slice of bread top the cream cheese with most of the shredded cheese. Leave about 2 Tablespoons or so for later.
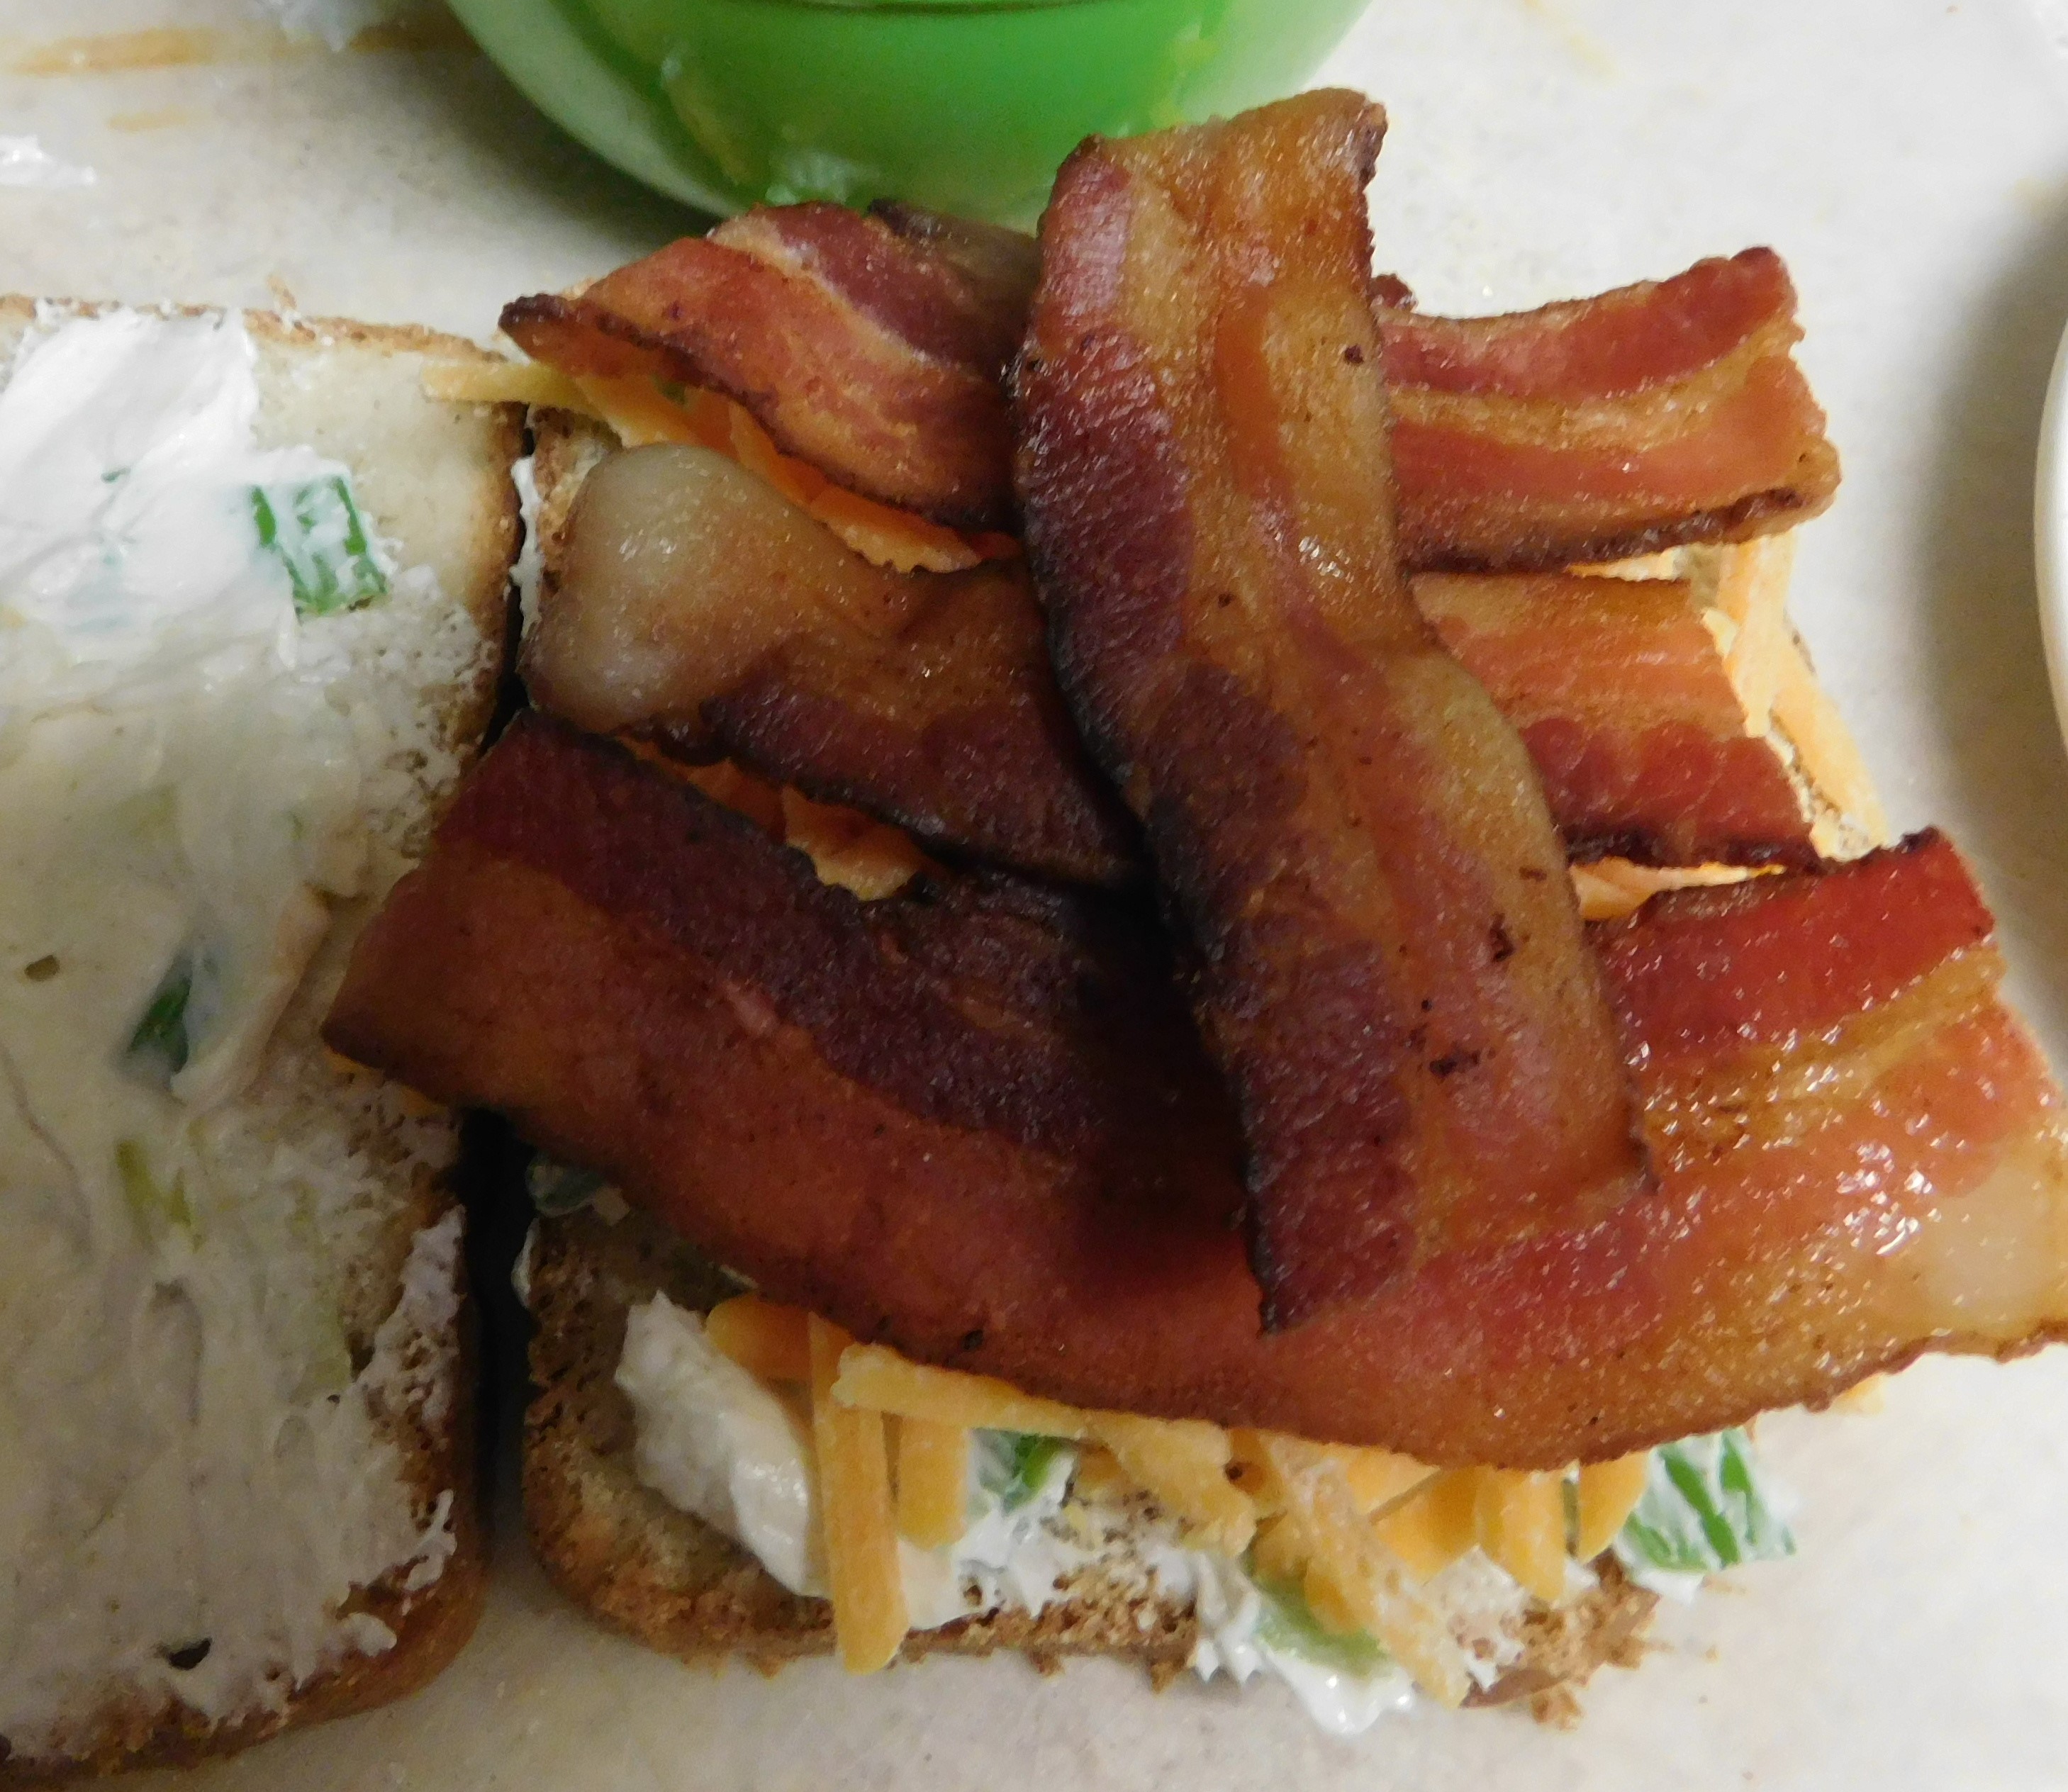


Top the cheese with the bacon.


By now the jalapenos. should be ready to cut in half lengthwise and scrape out the seeds and any ribs from the inside. Add the jalapeno halves on top of the bacon.


Top the peppers with the remaining cheese (this helps to “glue” the sandwich together)


 Melt 1 Tablespoon of butter in a preheated skillet and add the sandwich. Cook on
the first side over medium heat for about 5 minutes until the bread is nicely toasted.


Carefully flip the sandwich and cook on the second side until well toasted. You may need to add some more butter to the skillet when you flip the sandwich depending on how much the bread on the first side absorbed.


Slice and serve with you favorite sides.


Makes 1 (very large) sandwich.


You can find a downloadable/printable version of this recipe here.


Jalapeno Popper Grilled Cheese Sandwich


(per sandwich)


2 jalapeno peppers

1 Tablespoon olive oil

2 slices bacon

2 ounces cream cheese, softened

1 green onion

¼ teaspoon garlic powder

2 slices of bread (mine was sourdough)

¾ cup shredded cheese (I like to use a 4 cheese Mexican blend cheese)

Butter to cook sandwich in


Use the olive oil to coat the jalapeno peppers and char under the broiler for about 5 minutes per side. Cover and allow to sweat until softened, about 5 minutes.


Cook the bacon.


Slice green onion and combine with cream cheese and garlic powder.


Spread cream cheese mixture on one side of each slice of bread.


Top cream cheese with shredded cheese, reserving about 2 Tablespoons of the cheese.


Top shredded cheese with bacon.


Remove charred skins from peppers, cut in half and remove seeds and ribs.


Add peppers to sandwich on top of bacon.


Sprinkle with remaining cheese.


Melt about 1 Tablespoon of butter in skillet, add sandwich and cook over medium heat about 5 minutes until bread is well toasted.


Carefully flip sandwich, adding more butter to skillet if needed.


Cook on second side until well toasted and cheese is melted, about 5 minutes.


Enjoy.


Monday, January 9, 2023

Grilled Broccoli and Cheese Sandwich


Today I decided to share with you all what has become one of my favorite comfort food meals. Now if you are watching your calories, you probably want to just skip this one because it probably has almost enough calories for the your entire day. But I am a firm believer that once in a while we need to indulge ourselves and this sandwich will do just that. All the while also sneaking in a full serving of veggies in the filling.


So let’s start with those veggies since we need to get them roasting for our first step. I have used fresh broccoli in this in the past and that was what was called for in the original recipe that this one descends from. However I have found that frozen broccoli works just as well and is a lot more convenient since I try to keep a bag of it in my freezer all the time. If you have some cut or chopped broccoli you will save yourself a step, my store was out so I am using frozen broccoli florets.


Cut up the larger pieces so they will fit into the sandwich better and toss with the chopped onion some olive oil and seasonings. This needs to be done immediately before putting them in the oven. If frozen veggies go into the oven completely frozen they roast much better and cook evenly. If they start to defrost they tend to burn a lot and not cook evenly. Roast at 425°F for about 15 minutes.


While the broccoli is roasting we can prepare the rest of the filling. For that mix the cream cheese with the shredded cheese. I am using pre-shredded 4 cheese Mexican blend cheese. This is another thing that is almost always in my fridge all the time so it tends to be my go-to. You could also use shredded cheddar for this step. The combination of the cream cheese with the shredded cheese is what makes this sandwich so decadent. It really adds to both the flavor and the texture of the filling.


Spread one side of both pieces of bread with some butter. 


Then coat the other side of one of them with the cheese filling.


Once the broccoli is roasted remove it from the pan and put the pan back in the oven while you finish assembling the sandwich.


To do this place the roasted veggies on top of the cheese filling then top with the second slice of bread butter side up.


Remove the baking pan just long enough to put the sandwich onto it and return it to the oven for 5 minutes.


Remove the pan from the oven for only as much time as it takes to flip the sandwich and then back into the oven for another 5 minutes.


The secret to getting that wonderful brown outside to our sandwiches in the oven is to have the baking sheet as hot as possible. If it cools even for a few seconds your sandwich won’t get as brown as it should. It will still taste wonderful it just won’t be as pretty.


Remove the sandwich to a cutting board to cool for just a couple of minutes then cut as desired and serve.


As for the following recipe I decided to just give you the amounts for one sandwich so you can make as many or as few of them as needed. The only issue I can see with many a bunch of these would be being fast enough to keep the pan hot enough to get them all really browned.


You can find a downloadable/printable version of this recipe here.


Grilled Broccoli and Cheese Sandwich


8 oz frozen broccoli, cut up

1 green onion, cut up

olive oil

¼ teaspoon paprika (smoked paprika is really good in here)

¼ teaspoon onion powder

¼ teaspoon garlic powder

2 Tablespoons cream cheese, softened

½ cup shredded 4 cheese Mexican Blend Cheese (or shredded cheddar)

2 slices sourdough bread

1 Tablespoon butter, softened


Pre-heat the oven to 425°F.


Combine the cut up broccoli and onion in a bowl and toss with the seasonings and just enough olive oil to coat. Spread on a baking sheet and roast for 15 minutes or until brown and tender.


Meanwhile prepare the rest of the sandwich.


Combine the cream cheese and shredded cheese and set aside.


Spread one side of each slice of bread with the butter.


Spread the cheese mixture on the other side of one of the slices.


When the broccoli is finished remove it from the pan and return the pan to the oven immediately.


Spread the broccoli mixture over the cheese mixture and add the other slice of bread butter side out to the top of the sandwich.


Take the baking sheet out of the oven only long enough to transfer the sandwich onto it and put it back in the oven for 5 minutes.


Remove from the oven only long enough to flip the sandwich and return to the oven to bake for 5 more minutes.


Remove to a cutting board for a few minutes then cut as desired.


Makes 1 sandwich.

Wednesday, October 20, 2021

French Onion Grilled Cheese


Okay first things first I love grilled cheese sandwiches. They are among my favorite sandwiches especially when they have extra stuff in them. I also love caramelized onions so putting them into a grilled cheese was the logical step to take here.


One of the things I don't like about grilled cheese sandwiches is when the cheese and other fillings don't get hot/melted through in the time it takes the bread to get perfectly grilled. I found this oven method of cooking a grilled cheese a while back and it is a game changer, the sandwiches come out perfectly browned and melty all the way through. I don't think I'll ever go back to cooking them in a pan this just so much easier and better.


The process is simple (and by the way on the occasions when you have to cook a bunch of sandwiches at one time this is a lifesaver) The most important step is to preheat your baking sheet in the oven while the oven is preheating. I neglected to do this step the first time I tried this and the first side of the sandwich just didn't get brown and crispy.


Most of the time I do like to line my baking sheet with aluminum foil mainly because clean up is even easier that way.


You can find a downloadable/printable version of this recipe here.


French Onion Grilled Cheese


1 medium onion, sliced

butter

4 slices of bread of your choice

4 slices Swiss cheese


Line a baking sheet with aluminum foil. 


 -note I am only making one sandwich in the pictures but the directions are for two-

Preheat your oven to 450° F and place your prepared baking sheet in the oven to preheat with the oven. It needs to be really hot for this sandwich to really work.


Meanwhile melt about 1 Tablespoon butter in a small skillet over med heat. Add the sliced onion and cook slowly until the onions are caramelized, if they start to look crispy turn the heat down. This needs to be a very slow process, it usually takes at least 20 minutes to get my onion the way I like it.


When the onions are cooked butter one side of each slice of bread. 


The add a slice of cheese to the un-buttered sides of the slices.


Divide the onions between two to these slices then top with the other two slices. (just like a normal grilled cheese)


Remove the hot baking sheet from the oven and quickly add the sandwiches to the pan and return to the oven.


Cook 5 minutes.


Remove from oven just long enough to flip both sandwiches over. Return to the oven and cook 5 more minutes.


Remove from oven and allow the sandwiches to sit on a cutting board for a couple of minutes before cutting in half. 


Makes 2 wonderful grilled cheese sandwiches.

Tuesday, July 17, 2018

Grilled Cheese Sandwiches with Caramelized Onions

This week I am sharing what has recently become my favorite sandwich of all time. I am just kicking myself for not coming up with it years ago. It blends one of my favorite sandwiches with caramelized onions (which I adore) to make a sandwich that is good anytime of year.


Since it is summer and the middle of a heatwave right now it goes great with a salad. In the dead of winter pair it with a bowl of your favorite soup and you will be cozy and warm.

My choice for the bread on this is a really dark rye, but feel free to use your favorite. I just love the combination of the dark rye with all the other flavors.

You can also play around with the cheese choices, my preference is Muenster and Sharp Cheddar but if you have another favorite try it out.

I used a WallaWalla Sweet Onion that weighed just over a ½ pound and it was close to perfect for two sandwiches. You can really use any onion for caramelized onions but a nice sweet onion is even better and just sooooo yummy. The only real secret to caramelized onions is to cook them on low heat until they reach a nice rich golden color.


Grilled Cheese Sandwiches with Caramelized Onions

3 Tablespoons butter
1 small to medium (about ½ lb) Sweet Onion, sliced
pinch kosher salt
1 teaspoon dark brown sugar
4 slices of dark rye bread
Dijon mustard
2 slices (1 ½ oz each) Muenster Cheese
2 slices (1 ½ oz each) Sharp Cheddar Cheese

Melt 1 Tablespoon butter in a heavy skillet over medium heat. Add the onion slices and a pinch of salt. Stir and cook just until the onions start to soften, about 3-5 minutes.

Reduce heat to low (as low as your stove will go) add the brown sugar to the onions and stir to coat. Cook 20 -25 minutes, stirring often until the onons are golden brown and look glazed. They should be very soft at this point. If at anytime they start to get crisp at the edges remove from heat and allow to cool a few minutes before continuing.

While the onions are cooking prep the rest of the sandwiches, lay out the bread and spread all 4 slices with mustard (the amount is up to you, I don't measure I just put on the amount that looks good)

Place the Muenster cheese on 2 slices and the cheddar on the other 2.

Once the onions are cooked divide them evenly between the slices of the bread with the Muenster cheese then top with the slices with the cheddar.

So at this point your layers of sandwich should be as follows:
rye bread
mustard
muenster cheese
caramelized onions
cheddar cheese
mustard
rye bread

Turn the heat back up to medium under the skillet you have been using and add 1 Tablespoon of the butter. Once the butter melts carefully add the sandwiches. Cook about 3 or 4 minutes until the bread is toasted.

Add the last Tablespoon of butter flip the sandwiches and cook another 3 or 4 minutes until the other side is toasted and the cheese has melted.

Enjoy!!


Friday, June 30, 2017

BBQ Pork Sandwiches


On a hot day there is nothing like a dinner you can put on the table in just minutes. If you have some leftover cooked pork (leftover pork roast is perfect) this one is on the table in about 20 minutes.


The first step is to mix up the BBQ sauce. This one takes the short cut of your favorite bottled sauce then it gets a few additions (only 2 actually) and it becomes something that is just amazing. One of the ingredients might surprise you but this sauce has quickly become my favorite. I have made this with several different flavors and brands of bottled sauce and they all turn out great. Don't worry you won't actually taste the cola it just lightens up the bottled sauce and makes it taste a lot fresher.

While the sauce is simmering you can cut up that cooked pork. After that all you need to do is let the sauce and the pork get to know each other and you have a wonderful dinner. I serve this on purchased hamburger buns but I think it would also be really good over a bed of rice.


BBQ Pork Sandwiches


½ cup bottled BBQ sauce
½ cola (regular with sugar not the diet stuff)
1 Tablespoon dry minced onion
1 ½ diced cooked pork
2 split hamburger buns


Combine the BBQ sauce, cola and dry onion in a small saucepan and bring to a simmer. Allow to simmer about 10 to 15 minutes. This allows the flavors to mellow and the onion to soften.

Add the cut up pork and simmer for another 5 minutes or until hot.


Serve on buns.


Friday, June 9, 2017

Flaky Sandwich Roll

I actually found this recipe (or at least the one that this was based on) last December. I had decided to do an appetizer buffet for Christmas day and was in search of items to go on it. I ran across a sandwich recipe and the first thing I thought was if I change it like this I would have an excellent sandwich for dinner. So the playing around with the recipe began.

We love this sandwich year round with a bowl of soup in the winter or with a salad now that the weather is getting warmer.

One of my favorite things about this sandwich is that it looks like it took a long time to make. But because we are using pre-made pie crust from the grocery store it goes together in just minutes.

One of the things I have played around on with this sandwich is different combinations of fillings. You really can use just about any deli meat and cheese combination you like. I picked out 3 of our favorites for this blog post but the variations are endless.

Following with the pictures of the sandwiches I will give you the exact fillings I used. At the end of the blog the recipe with the amounts can be found. The only real way you can mess this up is to use too much of whatever condiment you choose, this will cause the sandwich to get very watery and the bottom crust will be soft.

The first sandwich is the good old ham and Swiss. This is a classic combo and how can you go wrong with it? For the condiment on this one I stick to the classic roots and use Dijon mustard.


Next up is one of my favorite combos sliced turkey with provolone cheese and lingonberry jam. Do be really careful with the amount of jam in this one. I usually try to just barely put some under the meat then a bit more between the meat and cheese.


And lastly sliced roast beef, sharp cheddar with a creamy horseradish sauce. Yum!!  I have to say after eating all three varieties of the sandwich this week this one was our favorite. 


Each sandwich roll serves 2 so if you are feeding more people just make more rolls. If you are alone it can be re-heated the next day for lunch. And since I knew that I wanted to make all three variations of the sandwiches this week I made 2 for dinner one night so we could play around with re-heating them the next day. We found the two ways that worked the best for us were: (1st) heating the leftover sandwich pieces in the toaster oven (this is my favorite way to re-heat leftover pizza too) and (2nd) to partially re-heat in the microwave then finish re-heating in a hot skillet (this crisps the bottom back up) I think that although you could obviously get these hot again in the microwave the crust would end up soggy not nice and crisp.

Now for the recipe:

For each sandwich:

1 refrigerated pie crust
1 teaspoon of the condiment of your choice (mustard, jam, horseradish sauce, etc)
½ pound of deli sliced meat
1 slice (1 oz) of cheese

Heat oven to 425°.

Allow pie crust to warm up as directed on the package.

Lay pie crust out on work surface and spread the condiment of your choice (see my suggestions in the blog post) to within ½” of the edge.

Layer the meat on next keeping it in a row about 4” wide and leaving about an 1” at each end.

Top the meat with the sliced cheese.

Bring up the sides of the crust over the filling meeting in the middle. Pinch the top together you can leave this seam very plain or flute the seam to make it pretty for display.

Roll the ends of the crust making sure to seal the sandwich roll so you don't loose your filling on the baking sheet.

Move the sandwich roll to a baking sheet covered in parchment paper. Cut 3 or 4 slits in the top to allow steam to escape.

Bake for 20 to 25 minutes until golden brown.

Allow to cool about 5 minutes.

Cut into 4 slices and serve.

Serves 2